Keyword Research
Ubersuggest is a great free tool to start with for basic keyword research. There is a free (limited to 3 searches per day) and paid version, so time your searches wisely (or switch browsers).
Image Design
Canva is the best resource to find and create images and to design your cover! You can create your entire eBook within Canva, but it works better for smaller or free eBooks. Start a free trial here.
PDF Editor
ilovePDF is a great free PDF editing tool that lets you merge, split, combine, convert, and compress your PDF files. This can be useful if you create any supplemental material for your course.
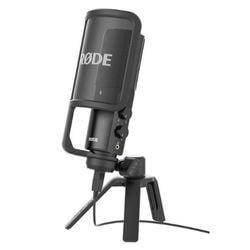
My Microphone
I have the RODE NT USB microphone. It's fairly expensive, but it's a great microphone. I invested in it because I have many online courses and also used it on my podcast.
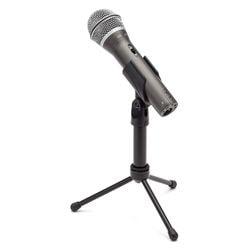
Budget-Friendly Mic
This Samson microphone is a bit cheaper and really highly rated. If that's still too much, here is another even more inexpensive option. Test and return if necessary!

Ring Light
This ring light is the one that I use. It's great because it comes with adjustable lighting and most importantly, the phone holder that I use to record my videos.
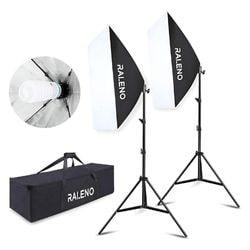
Lighting Equipment
If you are really struggling with lighting for your videos, you may want to consider getting some more serious lighting equipment. Sometimes it's the only way to brighten a room.
Camtasia (What I Use)
I use Camtasia to edit my videos. It was explained to me as having a lot of customizability and features like Adobe but much easier to use. You have to pay annually for it, but I find that it's worth the cost. You can always cancel when you're finished with your courses.
iMovie for Mac (Free)
I used to use iMovie for simpler edits when I recorded in a voiceover presentation style. It also allows you to do a lot of other graphics and animation but it's still limited compared to more powerful software. It's free and pretty easy to use if you have a Mac computer.
Windows Options (Free)
I must admit that I haven't owned a Windows in years and I read that newer versions don't come with a free iMovie alternative. So you may have to try out a couple of options before you find what works for you, but here are some free alternatives.
Website Theme
If you want to create a landing page on your website, you'll need a customizable theme like Astra to do so. It's a great free and customizable theme and also what I designed this website with (Pro version not necessary). Use the free Elementor plugin to customize Astra further.
Landing Page Software
LeadPages is great for creating landing pages for email lead magnets. It comes with the ability to set up a checkout and collect payments, but you can't host courses with this software. It's just for landing pages and it does cost money.

Course Software
If you decide to host and sell your course on your own on a platform (self-hosted), you can create a landing page and checkout page with the sales page bulider that comes with the software. No need to use anything else.